It’s silly, but I love my snake skin! Every time I setup my hammock tarp it makes me smile, because it’s one of those little things that just makes my hammock gear work better. Maybe you need to try it to believe it, so let me convince you that’s worthwhile.
What is a Snake Skin?
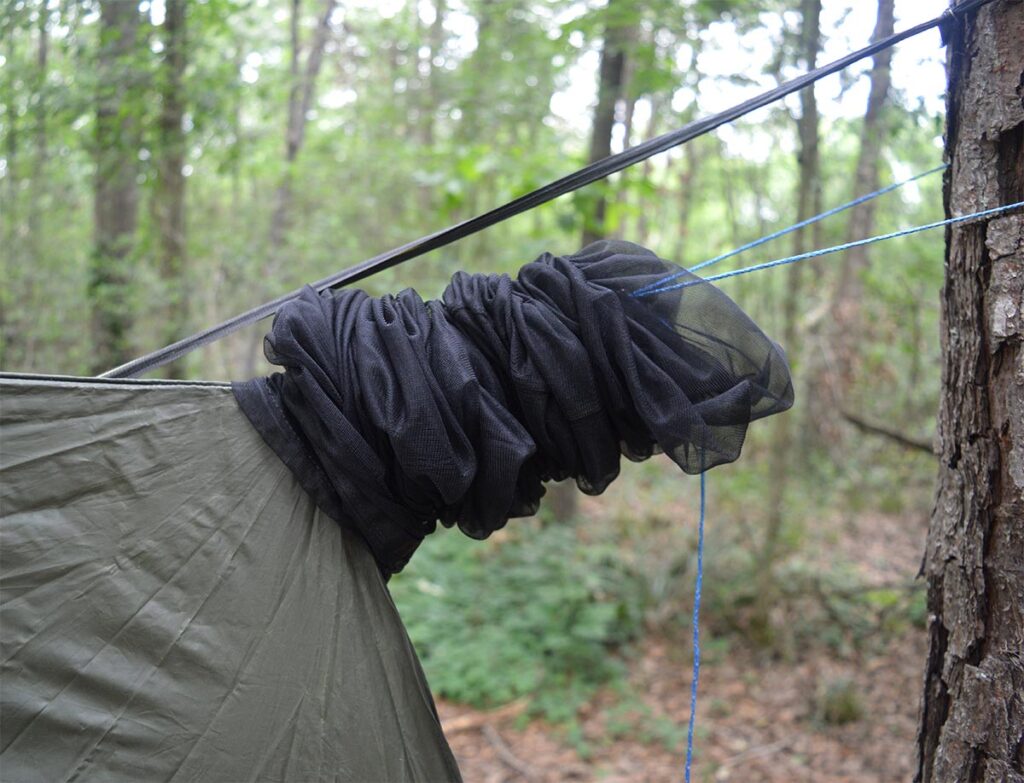
A snake skin, often referred to as a tarp sleeve, is a brilliantly designed piece of gear that has become a game-changer for hammock camping enthusiasts like myself. It’s essentially a tapered tube of lightweight material, such as silnylon, mesh, or DCF, that’s designed to cover and protect your tarp when it’s not in use.

Snake skins take their name from their appearance – it looks a bit like a shed piece of skin from a snake, long, narrow, and flat – sometimes bunched up or twisted a bit. The snake skin is installed over the length of the tarp with the two suspension points at each end. The tarp sleeve is the same length as your tarp, so you can hang the tarp while it’s inside the sleeve. If you use a continuous ridgeline, I recommend keeping the ridgeline attached to the tarp and in the sleeve with it.
The sleeve serves two main purposes. First it acts like a stuff sack, keeping the tarp contained, and organized with your other gear. But more importantly, it makes using a hammock tarp easier and more versatile. When choosing a tarp sleeve, be sure it is long enough to cover the full length of the tarp along the ridgeline. Most snake skins cover 12 to 14 feet in length.

Easy Tarp Setup and Packing
One of the most significant advantages of using snake skins is the hassle-free tarp setup and packing process. Gone are the days of struggling to fold a wet tarp or untangle guy lines; the snake skin made handling the tarp easy, most importantly, quick.
Snake Skin Setup
To set up your tarp (with a snake already skin over it), you start by connecting ridgeline ends or main tarp lines to the desired trees or other supports. Adjust the tension so the tarp (still in the snake skin sleeve) hangs above your hammock at the desired height. If it’s windy, you have already noticed the first improvement – the tarp isn’t blowing in your face as you try to hang it up. Even better, you can leave the tarp just like this – out of the way – until you need it.

When you’re ready to deploy the tarp, loosen the wide end of the snake skin. Simply slide it back towards the narrow end. Your tarp will expand out in seconds as you go. I leave my guy lines attached to the tarp grommets or D rings, so they are already there and ready to use immediately. The snake skin itself will bunch up on your tarp suspension, and be ready to use when you pack up.
Packing Up
Packing away is just as easy. All you need to do is slide the snake skin back over the tarp. Start from the narrow end and move towards the wide end. It works as an instant stuff sack system, ensuring your tarp stays neatly contained and compact for storage. It’s very useful when dealing with a wet tarp, because it stays off the ground and doesn’t pick up dirt. Guy lines attached to the tarp slide into the sleeve with no winding up required – you will need to stuff the last section of line into the end of the sleeve with the tarp.

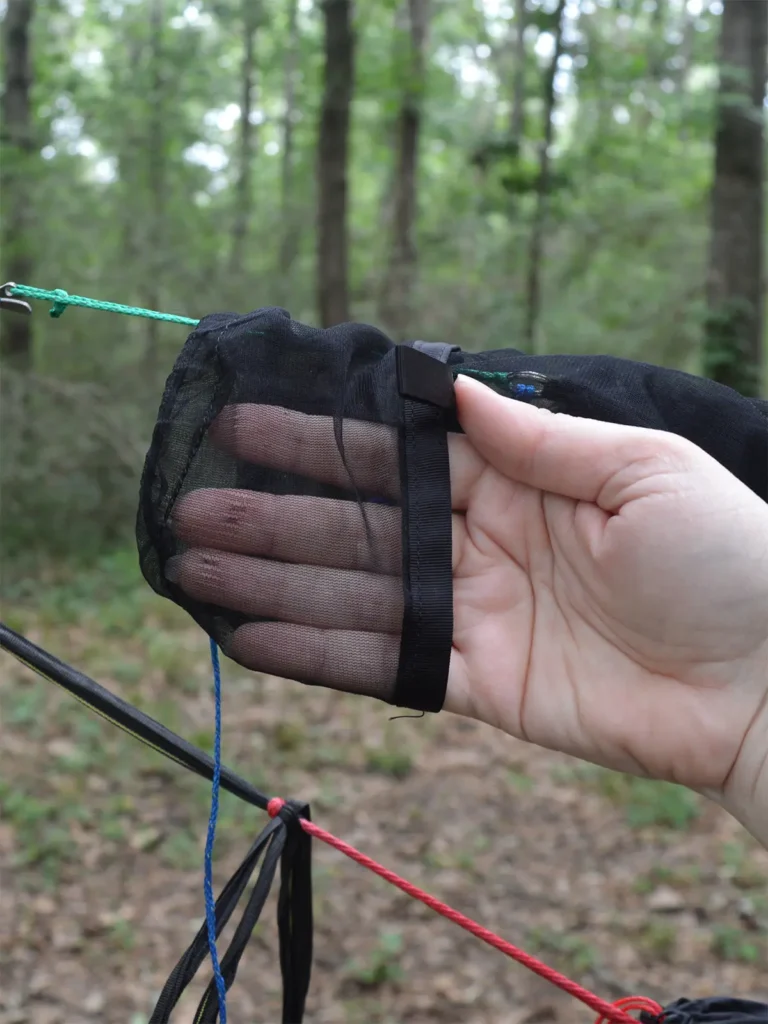
When you take down the tarp, you will have line sticking out of the sleeve on each end. My snake skin includes a pocket on each end where you can tuck the lines. This way they can’t slip inside the sleeve or get tangled with other gear. You can also clip the ends of the tarp together with a carabiner to keep them in the right position. Personally I prefer to wind up the line on a simple cord winder and leave it outside the sleeve.
How to put a Snake Skin Sleeve on Your Hammock Tarp
The easiest way to install a sleeve on your tarp is to first hang it up. You can use either a continuous ridgeline or a line for each suspension point. Now disconnect one end of line from the tree or other support and start feeding it through the snakesin from the wide end to the narrow end. Once the line is through, reconnect it to support the tarp. Continue sliding the snakeskin over the tarp slowly, and tuck in any excess material and guy lines as needed. If you have a two-part snake skin, you will repeat the same step for the other end (see below).
If you are using a DCF (Dyneema) tarp, it’s important to first roll up the tarp from the bottom. Then slide the sleeve over the tarp. This fabric may be damaged from sharp creases so it requires a bit more care.
Two-Part Snake Skins vs Single Snake Skins
When it comes to snake skins, there are two main types: two-part snake skins and single snake skins. Both are designed to cover and protect your tarp, but they function in slightly different ways.
Two-part snake skins consist of two separate sleeves that cover each half of the tarp and meet in the middle. To install them, you slide one sleeve over one end of the tarp and the other sleeve over the opposite end as described above. When you’re ready to deploy the tarp, you slide each sleeve from the center toward the end of the tarp.
On the other hand, a single snake skin is a continuous sleeve that covers the entire tarp. To use a single snake skin, you slide the sleeve over the entire length of the tarp. Start from one end and move towards the other. I prefer the single continuous version to keep things simple and fast.
Hammock Sleeve, Stuff Sack, or Both?
I’ve read discussions on hammock forums debating the benefits of snake skin sleeves vs stuff sacks. If you only look at the storage and gear organization aspect, stuff sacks are more compact. Long snake skins wrap around other gear and may be difficult to pull out of a tightly stuffed backpack.
However, as you see above, snakeskin sleeves do much more than just contain the tarp. I find the benefits far outweigh the organizational issue. When backpacking, I put the snake skin in the outside pocket of the backpack to keep it separated. It’s also the first thing I set up (even in good weather), so it’s easily accessible.

If you want the benefits of both, consider using both a snake skin and a stuff sack together. Use the snake skin for an easy and quick takedown, and then pack the tarp (still inside the snake skin) into a stuff sack for added compression and protection.
Snake skins for Hammocks
While snake skins are commonly associated with tarps, they can also be used with hammocks. They replace a hammock stuff sack and provide several benefits. Like tarps, the snake skin completely covers the hammock while it’s hanging up, so there is no risk of the hammock getting dirty from touching the ground while you set it up and take it down. You can also slide the hammock into the sleeve when not in use to keep it dry or safe from high winds. This sounds ideal for recreational hammocks which are not set up under a tarp.

These Hennesy snake skins are one option designed for hammocks.Some snake skins are also designed to accommodate hammock accessories, such as your bug net and underquilt. This makes it even more convenient to set up and pack away your entire hammock system at once. Note: I’ve never tried this so let me know how easy it is to stuff or compress an underquilt into the sleeve.
You will need an additional pair of snakeskins for your hammock. Because the snake skins have open ends, you can use any hammock suspension components – atlas straps, whoopie slings, or webbing with knots. Large carabiners may not fit through the ends, so you may need to remove them to install the sleeve over the hammock.
Hammock Tarp Sleeve Tips
Using a hammock tarp sleeve can significantly improve your hammock camping experience, making setup and takedown a breeze. To get the most from your snake skin, I’d like to share some tips that have worked well for me:
- Proper installation: Ensure that the snake skin is correctly installed along the ridge line of your tarp, with the narrow end facing the direction you plan to slide it during deployment. Do not pick a random point on the tarp to pull through the sleeve, it won’t give you any benefits.
- Slow and steady: When sliding the snake skin over the tarp, take your time and use gentle, consistent pressure. Avoid pulling too hard or too quickly, as this could cause damage to the tarp or the snake skin. I find it helps to pull the end part way across, then go back and work the bunched up fabric down the tarp to spread it out.
- Storage and ventilation: If you’ve packed away a wet tarp in the snake skin, make sure to air it out as soon as possible to prevent mold and mildew growth. When you get home or arrive at your next campsite, remove the tarp from the snake skin and allow it to dry completely before repacking.
- Single snake skins are not symmetric: A single or one part sleeve will only slide one way across the tarp. Consider this before you install it if you have a preference in your setup.
- Regular inspection: Periodically inspect your snake skin for signs of wear and tear, such as holes, fraying, or weakened seams. Address any issues promptly to ensure the problem doesn’t get worse.

Snake Skin Sleeve Material Comparison
When choosing a hammock tarp sleeve, one of the factors to consider is the material. Different materials offer varying levels of durability, weight, and breathability. In this section,
- Silnylon: Silnylon (silicone-impregnated nylon) is a popular choice for tarp sleeves due to its lightweight and durable properties. It offers excellent water resistance (which is great for protecting hammocks) and can withstand the rigors of regular camping trips. However, silnylon doesn’t provide much breathability, so it’s important to ensure the sleeve dries completely after a trip.
- DCF (Dyneema Composite Fabric): Also known as Cuben Fiber, DCF is an ultra-lightweight and strong material commonly used in high-end backpacking gear. It offers excellent water resistance and durability, but like silnylon, it has limited breathability. DCF is more expensive than other materials, but for those who prioritize weight savings, it’s a top choice.
- Mesh: Mesh tarp sleeves, typically made from polyester or nylon, provide superior breathability compared to silnylon or DCF. This makes them an excellent choice for storing a damp tarp, as the mesh allows for airflow and faster drying. Obviously the mesh won’t provide any water protection for hammocks or separate a wet tarp from other gear.
- Ripstop nylon: Ripstop nylon is another common material used for tarp sleeves. It is lightweight, durable, and moderately water-resistant. While it may not provide the same level of water resistance as silnylon or DCF, it’s a more budget-friendly option that still offers good durability.
I hope you found the information on snake skins helpful. Trust me on this: once you’ve experienced the amazingly quick set-up with a snake skin, there’s no going back.
Want more great information on hammock camping? Check out the articles below:
Hammock vs Tent Advice: Which Camping Style is best?
Hammock Ridgeline: Why you Need One (How to Use it)